Here is my first attempt at the advert, and then i have the final result, with some minor changes made, in result of class feeback.
Here is my last video, with the changes made. I am very pleased with my end result....
Wednesday, 8 December 2010
Production Log
Lastly, there was a few finishing off effects i did towards the end of my campaign. I used simply transform techniques to bring out the ending of my campaign.
I used rotation and opacity effects, on my zodiac symbols and my painted logo.

Here is my zodiacs opacity key frames, set to the right of the picture. The first keyframe holds the opacity as 0, so not seeable from the start of the advert, right up until that specific frame in time. The next one is set to 100%visble, making the signs automatically appear. I chose them to appear at this point in time, which is when my leaves patterns get close to the symbols
 This is the symbols with the opacity set to 100%.

Here on my logo, i have used opacity and rotation keyframes. Once the object is un-masked, i rotated the object, and made the opacity fade out for the logo, and fade in for my stock picture of my beer and the proper logo.

As you can see her, the stock image is almost fully 100% and the painted logo, is almost 0%.


Here is my timeline, with my big composition dragged in. Also, all the position keyframes that i have made, which tracks all the masking that happens. The soundtrack has also been placed onto the timeline.

I used rotation and opacity effects, on my zodiac symbols and my painted logo.

Here is my zodiacs opacity key frames, set to the right of the picture. The first keyframe holds the opacity as 0, so not seeable from the start of the advert, right up until that specific frame in time. The next one is set to 100%visble, making the signs automatically appear. I chose them to appear at this point in time, which is when my leaves patterns get close to the symbols


Here on my logo, i have used opacity and rotation keyframes. Once the object is un-masked, i rotated the object, and made the opacity fade out for the logo, and fade in for my stock picture of my beer and the proper logo.

As you can see her, the stock image is almost fully 100% and the painted logo, is almost 0%.

All that was left to do now, was to drag my finished composition, into the correct size composition (1280x720), and make position key frames, to give the camera panning effect. Also i would have to bring in my background soundtrack as well.

Here is my timeline, with my big composition dragged in. Also, all the position keyframes that i have made, which tracks all the masking that happens. The soundtrack has also been placed onto the timeline.

Here is what it looks like, zoomed in, onto my art work, and about 12 secs into the advert.
After, completing all my advert, all i had to do is add the video to the render que, and render it out as a quicktime movie.
Production Log
Now all my designs are scanned in, it was time to import them into After Effects and start animating my advert.
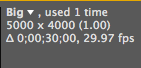
The effect i was going to use, was the write on effect to give the masking effect, that makes my designs, look like they are being drawn onto my page. Firstly, tho, it is important to state to you that, because there is so much artwork involved in this project, i would be able to keep it all in, within the 1280x720 composition. So instead, i will create all my artwork, in a composition which is 5000x4000, and animate it all within that composition. Then lastly, i will have to drag that composition into a new, correct size composition (1280x20) and create key position key frames, which gives the effect of the camera tracking and panning with the artwork and masking.
Composition size
Now it is time for the 'write on effect'. The write on effect gives you the effect that everything you see is being drawn onto the background. All i had to do is select the write on effect, in the effecs and presets window, on the right hand side. Then once i found it, i simply dragged the effect onto the layer (in timeline), to apply the effect to this specific layer. Once i applied it to the layer, all that was left to do is fiddle around with the settings, like selecting the colour of the brush i wanted, the spacing of the brush, and the brush hardness.


To start drawing upon the layer, i would have to click brush position frame, which allows you to position where you want to start masking. Then, all that was left to do was to start moving along the time frame, and apply the brush effect to the image.
Once doing this, i come up to my first problem, which was the brush was never going to cover up the whole of the tribal parts, and there was really intricate and detailed parts to mask.
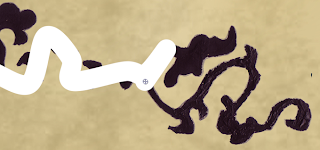
The way i overcome this, was to duplicate the layer, and apply a second write on effect, to fill in the bits that i missed with the first write on effect. The only thing i had to do differently was to change the colour of the brush, in order to stop getting muddled up with which brush was which.
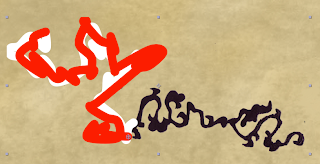
I had to reveal my whole tribal design, within 6 seconds, to keep within my timings set in my storyboards.
I used this write on effect on the majority of designs within the campaign/advert. However, there was a couple of other techniques i used as well.
For my fish and ying yang ball, i used the simple mask, to un-reveal them, and this is how i did it:
All i did, to make a mask was select the layer, within the timeline (fish and ying yang) and right clicked on them, and selected: mask- new mask. Once doing this, it brought up a simple yellow box, on the display, which is technically the mask, and if it was over the image, it reveals it, and if it is not, the object is hidden. All i would have to do is, select the mask, and move it point by point, as the time went on, in the timeline.
In this image, you can see the yellow box, but no fish, as it is not over the fish.

All my masking would have to reveal the whole fish within 4 seconds, in order to follow the timings i set within my storyboarding.

Now you can see the tail of the fish, as i have dragged the mask to reveal this.

The whole body of the fish is now revealed. You will see the mask has points, which have been adjusted, in order to mask round the fish's body parts, in order to keep the whole body revealed. I did this by using the...........
 Pen tool. The pen tool, allowed me to select points of the mask, which i wanted to stretch out, and bend the other way, in order to cover up the whole of the fish. You can see, the places where i had to use the pen tool most, was around the fishes tail and geels.

Lastly, this box shows you the position key frames to the left, along the timeline, which i changed the position and shape of the mask, to reveal the fish. Also, after having some feedback by class mates, i made a slight feather to the mask, so when revealing the mask, it didn't have such a hard edge, ad looked more like it was being printed on the page.
The effect i was going to use, was the write on effect to give the masking effect, that makes my designs, look like they are being drawn onto my page. Firstly, tho, it is important to state to you that, because there is so much artwork involved in this project, i would be able to keep it all in, within the 1280x720 composition. So instead, i will create all my artwork, in a composition which is 5000x4000, and animate it all within that composition. Then lastly, i will have to drag that composition into a new, correct size composition (1280x20) and create key position key frames, which gives the effect of the camera tracking and panning with the artwork and masking.
Composition size
Now it is time for the 'write on effect'. The write on effect gives you the effect that everything you see is being drawn onto the background. All i had to do is select the write on effect, in the effecs and presets window, on the right hand side. Then once i found it, i simply dragged the effect onto the layer (in timeline), to apply the effect to this specific layer. Once i applied it to the layer, all that was left to do is fiddle around with the settings, like selecting the colour of the brush i wanted, the spacing of the brush, and the brush hardness.

To start drawing upon the layer, i would have to click brush position frame, which allows you to position where you want to start masking. Then, all that was left to do was to start moving along the time frame, and apply the brush effect to the image.
Once doing this, i come up to my first problem, which was the brush was never going to cover up the whole of the tribal parts, and there was really intricate and detailed parts to mask.

The way i overcome this, was to duplicate the layer, and apply a second write on effect, to fill in the bits that i missed with the first write on effect. The only thing i had to do differently was to change the colour of the brush, in order to stop getting muddled up with which brush was which.

I had to reveal my whole tribal design, within 6 seconds, to keep within my timings set in my storyboards.
I used this write on effect on the majority of designs within the campaign/advert. However, there was a couple of other techniques i used as well.
For my fish and ying yang ball, i used the simple mask, to un-reveal them, and this is how i did it:
All i did, to make a mask was select the layer, within the timeline (fish and ying yang) and right clicked on them, and selected: mask- new mask. Once doing this, it brought up a simple yellow box, on the display, which is technically the mask, and if it was over the image, it reveals it, and if it is not, the object is hidden. All i would have to do is, select the mask, and move it point by point, as the time went on, in the timeline.
In this image, you can see the yellow box, but no fish, as it is not over the fish.

All my masking would have to reveal the whole fish within 4 seconds, in order to follow the timings i set within my storyboarding.

Now you can see the tail of the fish, as i have dragged the mask to reveal this.

The whole body of the fish is now revealed. You will see the mask has points, which have been adjusted, in order to mask round the fish's body parts, in order to keep the whole body revealed. I did this by using the...........

Lastly, this box shows you the position key frames to the left, along the timeline, which i changed the position and shape of the mask, to reveal the fish. Also, after having some feedback by class mates, i made a slight feather to the mask, so when revealing the mask, it didn't have such a hard edge, ad looked more like it was being printed on the page.
Subscribe to:
Posts (Atom)