Friday 15 October 2010

The tools and Techniques

All my animations consisted of the same tools and techniques.
If you click on the layer that you are going to animate, click the little arrow that points down by the side of its name, which brings up the transform tools. Things such as position, allows you to move objects, rotation obviously rotates etc. This is how i got all my techniques into my seperate animations.

A tip given to us by our lecturer, was instead of having all the transofrmations up at once, you can select just one, or two or three, rather than having them all up at once, and getting into a puzzle and getting frustrated.  So for the position, I pressed P, and for any other that i wanted, i would have to hold Shift before there letter. I used Opacity in my weights part of my Gym animation.

These three pictures show you the effect of rotation and position. I also used, scale and opacity in others scenes. As you can see obviously the above and bottom picture are in different positions giving them an effect that makes them look like they move. And the picture to the side shows you that the object has clearly rotated.


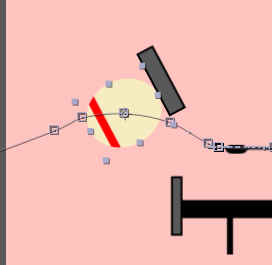
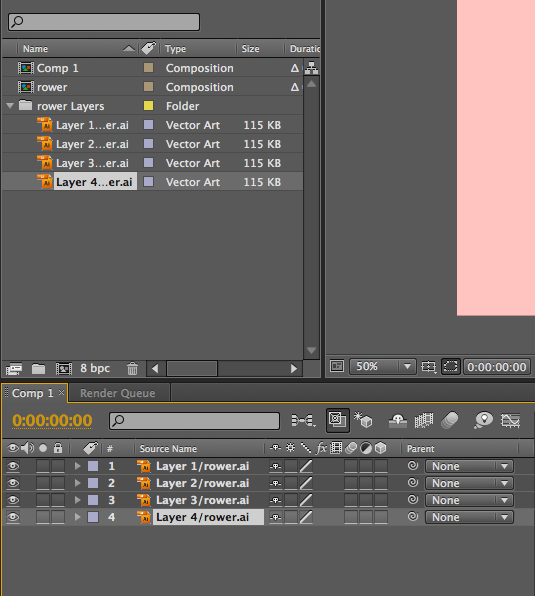
Here is the puppet/ pin tool, and this is what i used to give an effect to my diving boards, making them look like they are bendning.


This will give you more of a clear idea.


Lastly, i just wanted to show you my canvas to give you more of a clear idea of how big my art board was for my trial animation, compared to the 1280x720 composition i had to use in After Effects. This is where i used position key frames to make it look like the camera was moving with the object/bike.

Production Log

The first thing i had to do, is make a new composition. We were told to make all compositions 1280x720. However, on my trial bike animation, i had a 6000 px art board, so this is where i would have to get the trackign camera effect to come into play. All i had to do is position key frame and move the background along, so it would be like the camera is following the bike.


Here is the dialogue box, that pops up, when you are made to choose your size of composition. You can also choose other options such as the colour of your artboard, and the duration you would like it to end to and from, etc...


 Then it was time to get all my artwork from Illustrator. Here i had to click on File>Import>File.


 In this case, i was choosing my Rowing scene, so i had to select, the specific Illustrator file. Lastly, in class, we was told to select the Import  As: selection box, further down the screen, and select Composition - Cropped Layers. It originally comes up with Footage, but we would have to change this, simply as it includes the layers, we originally made in Illustrator, and allows us to animate the specific things that i would like to move etc..

 Here it shows me the files that are Imported into my Composition Layer libary (top left), and all i had to do is drag it down onto the time line, ready to be animated (bottom of pic).

Thursday 14 October 2010

All Art Work drawn up in Illustrator


I will cut, through all three of these scenes (Treadmills, Rower and Weights) to make up one animation. My lectures told me to save them as compositions in seperate files, and then drag all three into a new one, and set them at various points to make up 15-20 secs

This is my trials animation, i have deliberately made it too big for my 1280 by 720 composition so i can use the technique where the camera tracks along with the bike and rider. www.miniclip/trialbikepro.com has a version of the game where you will see how i was inspired by the idea.

Lastly here is my diving board/water scene, where i am going to animate my character diving in water, and i will flex the diving board, and dramatize the flex and waves because the size of the object diving in. As you can see the man on the left is quite alot bigger then the one on the right. 

 My technique of work, was to draw everything in one layer. Then when the artwork was complete, i had to think about what i was going to animate, and then that was when i had to copy the artwork that i wanted, delete it, create a new layer, and insert that particular art work on that specific/ different layer. (Click art work, Apple X, Button: New Layer, Apple V)


Tuesday 12 October 2010

Project Sizes

We have been given the dimensions that our projects should be displayed in. These are 1280 by 720 pixels.

Although my gym scenes will not have any camera movement in them, i will simply create my artwork on an artboard that is these specific dimensions. However, with my trials bike idea, i will make it bigger sizes as i would like them to have a sense of the camera tracking the object.  When creating my art work on the Trials animation, i made my height the same (720) and the width changed to 5000. Once i did this all i simply had to do is select key frames on position (background) and move it along, as fast as i wanted the camera to track with the object.

Monday 11 October 2010

Youtube Converting for sound tracks.

After showing my Lecturer my animation, and getting the approval after some minor changes, it is time to look for some music. Looking at my gym scenes, we thought it would be an idea for me to use the theme tune, 'Macho man' as he is doing all sorts of work outs and sterotypically what a macho man does.


As i am doing a sort of chase scene from diving board to diving board, i will use this theme tune, as i have had it recommended by a friend and think it will fit in well with the comedy and actions:


I will use http://www.video2mp3.net to help me convert into a rip, which is nice and easy.

Now all i have to do is find alot of re-occuring motorbike sounds to loop for my trial bike animation.

Sunday 10 October 2010

Practising in After Effects

Before i jumped into the deep end with my project, i had to practise some techniques within After Effects, in order to make a start with it all. Here are some basic techniques i have learnt through Lectures and online tutorials:


Squash and Streching:


This technique will be useful in most of my animations, as i will squash and stretch most items, to give them a more realistic effect.


Motion paths and sketching:


Motion sketching is where you can actually scrible/draw the path that you want your designated object to move to and from, and will be particularly helpful for moving 'human like, pretend people' (in other words eggs) and also for the path that i want my bike to ride over obstacles.


Parenting objects with another:


Parenting shapes to one another will be particularly helpful for my bike animation, as i will parent the wheels to the chassis/frame and person.