Friday, 9 October 2009

Layer Mask

As i said, the next step of my project is to apply layer masks to it, which would get rid of those horrible dividing lines, that break up the pictures. In order to do this, i had to create layer masks which would get rid of these. All i had to do is select the layer that overlapped the layer in front of it (ie, layer two would overlap layer one, and so on), click layer mask at the bottom of the layer pallet, use a wide diameter brush, with the colour black that fades away the overlapping picture, and allows the picture from under to blend in. Or with the colour white, you can rub out the picture from underneeth and the top layer will appear again.

This shows me clicking the layer mask button at the bottom of my layer pallet.


This shows you a list of all the layer masks in my layers.


This shows you the tool box which is placed at the right hand side of the screen. As you can see the brush tool is almost at the top of the box, and is displayed with a little paintbrush tool.
Then at the bottom of the box is the colour that is painted by ur brush, i.e either white or black to produce the layer masks.

Warping and Distorting

Warping and distorting my photo's was fairly simple, but in fact made such a better impact and look to my QTVR, made it worthwhile. All I had to do is select the layer that did not align with the previous or following layer, and select the edit button at the top of the window and select either free transform, transform and distort, or transofrm, warp.

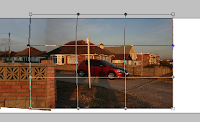
Distorting the photo's allowed me to stretch the whole photo, matching and aligning the lines with the other photos. Warping the photo is the same idea, however you can stretch smaller parts of the photo, rather than the whole photo. Distorting gives me a big square surrounding the whole photo, with lines surrounding it, which i could then, drag out, resulting to stretching the photo out. Warping gave me the same thing, but covering the photo was a small grid, indicating where/columns/parts i could stretch in the designated area of the photo.

Photo's below give you more of a clear idea.

This is what the box looks like when you select distort.                                                           


This is going through the window for warping the photo's.


 This is the window guide for distorting the photo. Don't forget to press the free transform section first.


 This is the grid lines that come up when you warp the photo.

Tuesday, 6 October 2009

After seeing my photo's all chained up together, one after the other, you will notice a significant change in the light; due to the fact of the sunshine dimming the lens, giving a much more darkened effect on the photo. Notice on the picture below that each photo on the right (ie as the camera panned around) the colour of the photo's become a lot more dark and you can not see as much detail as you could.


To over come this i had to add an adjustment layer to the specific layer that i wanted to brighten up, by clicking on the adjustment layer button at the bottom of the layers pannel, however the adjustment layer changed the overall brightness of the whole canvas. In order to change this i had to control click between the layer i wanted to change the brightness of, and the actual adjustment layer. These pictures below will give you a better idea.


The picture on the left shows that i was adjusting the brightness to a layer by +126. Then all i had to do is click in between layer 16 and brightness/ contrast layer to apply to that single layer, rahter than the whole canvas (picture on the right).

The next step of my project is to warp and distort lines which will align all my photo's together, and get rid of those horrible distinct lines, separating my pictures up, indicating the separate pictures, which obviously will make the QTVR a lot more better looking and realistic.

Project Development

First I had to take some photo's of the area i wish to make my QTVR on. In this instance, i have taken my pictures on the cliff top in peacehaven. The picture below shows you all the photo's i have taken, and the actions i had to perform on the PC, in order to transfer all the photo's into Adobe Photoshop.


As you can see, i had to shift click all the pictures that i had taken, and right click them, selecting open with, and then select Photoshop. This then opened all my photo's in my desired area(Photoshop).
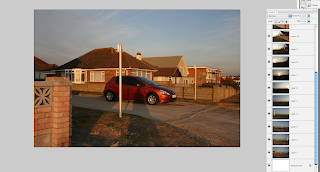


All the photo's then popped up in photoshop, but in separate documents. I had to then select each individual photo, pressing Apple A (select all ie, the picture), Apple C, (copying the picture), Apple W (closing the original file/document), then Apple N (opening a new document, which i had to rename, giving this a project name). Finally clicking Apple V (pasting the image into it's new document). The last process was to do this with all 16 layers i had.

After importing all my photo's into one document, i had to extend my canvas and move each separate layer into the order they were shot, i.e the first layer would be the photo i started off with at my 360 degree point, and my last would be the last photo i took.

The end result looked something like this:


Monday, 5 October 2009

New Theme: East Sussex Seaside

After i had wrongly taken my photo's i had to think of a new theme. As i am pushed for time, because the deadline is within a week, i came up with the theme of the "Seaside", I will probably only be able to create two Panorama's as i have only just got used to the software Photoshop and I have never worked on a Apple Mac before, making me slower compared to most people, and additionally I have  to produce a 750 word essay as well.


This is my first Panorama that i am going to create. It is a shot of the cliff top in Peacehaven where you can see the famous landmark "The Meridian Point".


The second Panorama is at the
Saltdean cliff top, near a seaside cafe, and as you pan towards the left, you can see rocks out at the shore of the sea which is in fact in the next town along, Rottingdean, and even further into the distance, is the Brighton Marina.


I chose these destination as i felt that the view is fairly pleasing and calm. It is fairly close to where i live and they include some landmarks which is quite interesting.